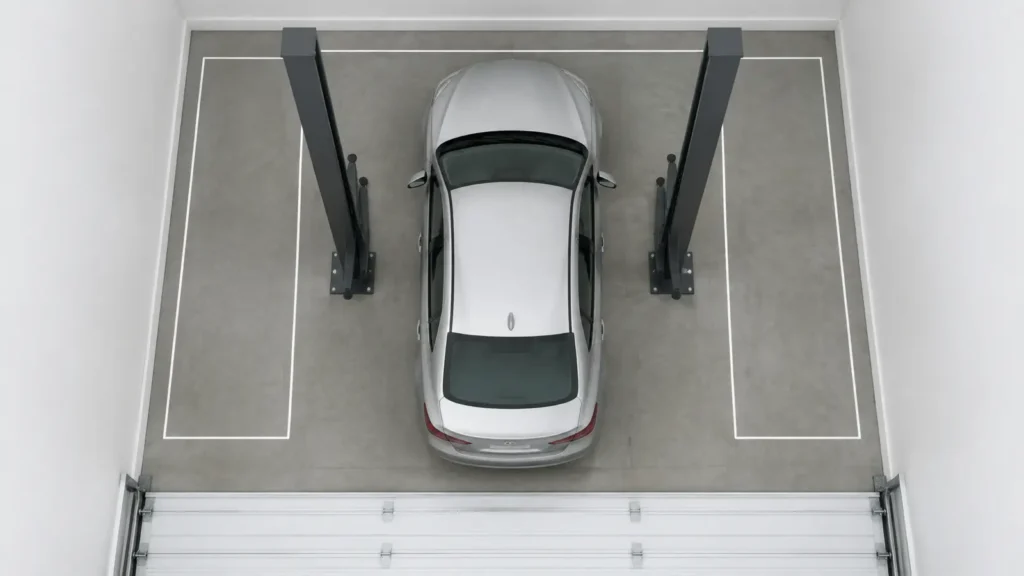
You should have at least 3 ft (914 mm) of clear floor between each side wall and the widest part of a 2-post lift, which is normally the power unit. From the front wall, set the column centerline about 10 ft (3.05 m) for asymmetric arms or 12 ft (3.66 m) for symmetric arms.
Treat any 2 post lift distance from wall figure as a starting point. Your installation manual and your longest vehicle set the final number.
Your car lift has arrived and the garage has been cleared for its installation, once the anchors go in, it stays there unless new holes are introduced in your slab.
This guide will show you how to install the columns, where the best positions are, how much room is required per side and how to test your automotive lift with tape before you go and order. It builds on our complete automotive lift installation guide, so you plan placement first and install second.
Key takeaways
- Side walls. Plan 3 ft (914 mm) minimum per side, measured from the widest point, which is usually the power unit.
- Front wall. The wall your bumper faces. About 10 ft (3.05 m) to the column centerline for asymmetric arms, about 12 ft (3.66 m) for symmetric.
- Longest vehicle first. Park it where you want it lifted, then place the columns around it.
- Bay width. The lift's overall width, power unit included, plus 6 ft (1.83 m) of combined side clearance.
- Two-car garages. One lift usually takes most of the width. Plan the leftover strip for benches, not a second car.
- Overhead. Measure with the garage door open. The track and opener are the usual problem.
- Anchors. Keep them at least 6 in. (152 mm) clear of joints, cracks and slab edges, or more if your manual says so.
- Tape it out. A roll of painter's tape is the cheapest layout insurance you'll ever buy.
2 post lift distance from wall: the four-side clearance map
Each side of the lift needs its own clearance, because each side does a different job. The side walls give you room to swing arms and open doors. The front and rear give you a walkway. Overhead has to clear the vehicle at full rise.
So how far from the wall should a 2 post lift be? Use this map as your starting point.
| Side | Planning minimum | Why it matters |
|---|---|---|
| Side wall (non-power side) | 3 ft (914 mm) from the column | Room to swing arms, open doors and walk past with a drain pan. |
| Side wall (power unit side) | 3 ft (914 mm) from the power unit | The power unit sticks out from the column and needs service access. |
| Front wall, asymmetric arms | About 10 ft (3.05 m) to column centerline | The vehicle sits further back, so the columns can sit closer to the front wall. |
| Front wall, symmetric arms | About 12 ft (3.66 m) to column centerline | The vehicle sits centered, so more of it hangs out in front of the columns. |
| Rear (garage door end) | 3 to 4 ft (914 mm to 1.22 m) past the bumper | A walkway behind your longest vehicle for carts and creepers. |
| Overhead | Below the lowest obstruction | The lifted roof must clear the door track, opener, lights and heaters. |
Side walls and the power unit side
Three feet per side is the figure we use in our step-by-step 2 post lift install. Here's the thing: measure from the widest point. On one side, that's the power unit, not the column.
We recommend putting the power unit on the side with the most room and the shortest run to your electrical supply. A licensed electrician has to reach it, and so do you whenever you check the fluid.
Key takeaway: the power unit side is the wide side
If one wall has to be tight, make it the side without the power unit. That one change gets rid of most side wall clearance complaints.
Which wall is the front wall?
In this guide, the front wall is the one your front bumper faces when you drive in. In most garages, that's the wall opposite the garage door.
Your 2 post lift front wall distance runs from that wall to the column centerline. Arm style sets the number, and we cover that below.
Line the columns up with your door opening, too. You want to drive straight in, center the car and stop. A layout that makes you swing the wheel at the last second slows every job.
Rear wall and arm swing
Once the front is set, the rear mostly takes care of itself. Your longest vehicle hangs behind the columns, and you still need a walkway past its bumper.
Also watch the arms. Parked arms fold alongside the columns, but they sweep out wide while you position them. Keep benches and toolboxes out of that sweep.
Why your longest vehicle decides where the columns go
Place the columns around the longest vehicle you'll lift, not around the lift itself. Most placement advice starts with a fixed number from the wall. We think that's backwards.
Here's the better way. Park your longest vehicle in the bay where you'd want it sitting on the lift. Walk all four sides. Can you pass the front and rear bumpers with a rolling cart?
Next, find the vehicle maker's lifting points and learn how to spot a vehicle on the lift correctly. The columns have to land where the arms reach those points while the vehicle stays balanced.
The Automotive Lift Institute's Lifting It Right training covers spotting and load stability in more depth. It's worth an hour before your lift arrives.
Mark where the columns fall. If your longest vehicle fits with room to walk around it, everything smaller will too.
Still choosing a lift style? Start with our guide to the different types of car lifts, then come back to lay out the bay.
Symmetric vs asymmetric: how arm style moves your columns
Arm style changes where the vehicle sits between the columns, so it changes your front wall distance. Here's how the two compare for placement.
| Factor | Symmetric | Asymmetric |
|---|---|---|
| Arm length | Front and rear arms equal | Front arms shorter, rear arms longer |
| Vehicle position | Centered between the columns | Set back, more of it behind the columns |
| Column to front wall | About 12 ft (3.66 m) | About 10 ft (3.05 m) |
| Door access | Columns can land beside the front doors, so exits get tight. | Columns sit ahead of the front doors, so you get out more easily. |
| Best fit | Long-wheelbase trucks and vans | Cars, SUVs and daily drivers |
What about door swing?
In a narrow bay, door swing often decides the arm style for you. If you mostly lift cars and SUVs, we'd pick asymmetric for the easier exit. If you lift long pickups, symmetric keeps the load balanced.
Compare the arm and width options across Daytona 2-post lifts, then check the spec sheet for your chosen model before you finalize the front wall number.
How much bay width and depth do you need?
Bay width is the lift's overall width, power unit included, plus 3 ft (914 mm) on each side. Bay depth is your longest vehicle plus walking room at each end. That's how much space you need for a 2 post lift, in plain English.
| Measurement | Formula | Example |
|---|---|---|
| Minimum bay width | Overall lift width, including the power unit, plus 3 ft (914 mm) each side | 11 ft (3.35 m) + 6 ft (1.83 m) = 17 ft (5.18 m) |
| Minimum bay depth | Longest vehicle, plus 3 to 4 ft at each end | 20 ft (6.10 m) + 8 ft (2.44 m) = 28 ft (8.53 m) |
| Column centerline | 10 or 12 ft from the front wall, adjusted to your vehicle | Confirmed by your tape-out |
When an adjustable-width lift helps
If your 2 post lift bay size is tight on width, an adjustable model gives you options. The LTPA10 adjustable 2-post lift offers three width settings: 88.6, 94.5 and 100.4 in. (2,250, 2,400 and 2,550 mm).
Need more capacity? The 12,000 lb LTPA12 offers 107, 113 and 119 in. (2,718, 2,870 and 3,023 mm).
A narrower setting leaves more wall room, and a wider one fits wider trucks. Ask your distributor for the overall outside width at each setting before you run the wall math.
Worked example: one lift in a two-car garage
Say your garage is 24 x 24 ft (7.32 x 7.32 m), and the lift is 11 ft (3.35 m) wide overall. These are example numbers only. With 3 ft (914 mm) per side, the lift bay takes 17 ft (5.18 m) of width.
That leaves a 7 ft (2.13 m) strip. It's great for a bench and storage. It's rarely enough to park a second car and still open its doors.
Depth tells a similar story. A 16 ft (4.88 m) sedan leaves 4 ft (1.22 m) at each end, which is comfortable. A 20 ft (6.10 m) crew cab leaves only 2 ft (610 mm) at each end. That's too tight to walk past with a cart.
Bottom line: a 2 post lift in a 2 car garage works well, but plan it as a one-car shop with storage.
What else has to clear the lift?
Walls are the easy part. What catches people is overhead and underfoot. The garage door is the obstruction most layout plans skip, and it's the one that shows up at full rise.
Garage door track and opener
Good 2 post lift garage door clearance means the vehicle's roof clears the track, the opener rail and the open door itself at full rise. Measure to the lowest point with the door fully open, not closed.
If it won't clear, you have three fixes: lower your working height, switch to a wall-mounted opener, or have a garage door pro change the track. Our low-ceiling options guide covers the tightest rooms.
Floorplate designs help under low ceilings because there's no overhead beam. The LTPF9 floorplate lift is 110 in. (2,794 mm) tall overall, and the LTPF12 is 114 in. (2,896 mm).
Warning: measure with the door open
A closed door hides the problem. Open it all the way, then measure from the floor to the lowest point of the track, rail or door panel. Use that number, not the ceiling height.
Floor joints, cracks and slab edges
Each column's baseplate anchors into concrete. Keep the anchor holes clear of saw cuts, control joints, cracks and slab edges. Our guide to concrete requirements for 2-post lifts covers slab thickness and anchor spacing.
By the numbers: 6 in. (152 mm)
That's the minimum planning distance between anchor holes and any joint, crack or slab edge in our concrete guide. Your lift manual may call for more. If it does, the manual wins.
Power, air and drains
Plan the electrical drop near the power unit side. A licensed electrician should run it to the specs in your manual. Keep air lines and hose reels outside the arm sweep.
A floor drain under the vehicle is handy. A drain under a baseplate is not, so shift the layout.
Not sure your bay works? Bring these five numbers to your local Daytona distributor. They quote, deliver and install, including single home-garage orders.
- Bay width, wall to wall
- Bay depth, door to front wall
- Lowest overhead point, measured with the door open
- Length of your longest vehicle
- Where your electrical supply is
Have a question first? Talk to our team.
Find a Daytona DistributorToo narrow for a 2-post lift? Consider a scissor lift
If your bay can't fit a 2-post lift plus 3 ft (914 mm) per side, look at a scissor lift. There are no columns beside the vehicle, so your side clearance is mostly room to open doors.
There's a trade-off, and it's worth being honest about it. The scissor mechanism sits under the vehicle, so some underbody jobs are harder to reach than on a 2-post lift. Browse Daytona scissor lifts to compare.
For tire, brake and body work, the LMS6 mid-rise scissor lift raises 6,000 lb to 54 in. (1,372 mm) and runs on 120V power.
Need more height? The LHS7 high-rise scissor lift handles 6,600 lb and reaches 74.5 in. (1,892 mm), with a 5 in. (127 mm) lowered height.
How far apart should lifts be in a multi-bay shop?
Give every lift its own 3 ft (914 mm) side clearance, so neighboring columns sit at least 6 ft (1.83 m) apart. Add more if tire carts, balancers or a drain line run between bays.
That's the planning distance between 2 post lifts. The width of your door openings sets the rest, since every bay needs a straight approach.
Where do the power units go? We'd rather see them on outside walls than jammed into a shared aisle. People trip over power units in walkways, and service access gets harder.
Leave room for inspection, too. The ANSI/ALI ALOIM standard calls for every lift to be inspected at least once a year by a qualified lift inspector. The Automotive Lift Institute also recommends an inspection whenever a lift is installed.
The tape-out test: check your layout before you buy
Mark the whole lift on your floor with painter's tape before you order. It costs one roll of tape. Drilling in the wrong spot costs a lot more.
- Park your longest vehicle where you want it on the lift.
- Tape both column baseplate outlines, using the footprint on your spec sheet.
- Tape the power unit outline on the side you picked.
- Check 3 ft (914 mm) of clearance at each side and walking room at both ends.
- Open every vehicle door fully and confirm it clears the tape.
- Open the garage door and measure to the lowest point of the track and opener.
- Mark slab joints and cracks, then confirm the baseplates clear them.
- Photograph the layout with a tape measure in the shot and send it to your distributor.
Pro tip: tape the arm sweep too
Swing a tape measure in an arc from each column to show how far the arms reach. Anything inside that arc, like a bench or a rolling cabinet, will get hit on install day.
Placement mistakes that cost you later
Most car lift placement in garage problems come from a few repeat mistakes. Here's what they cost and how to avoid them.
| Mistake | What happens | The fix |
|---|---|---|
| Measuring from the column | The power unit ends up against the wall | Measure from the widest point |
| Using a fixed wall number | Long trucks block the walkway | Place around your longest vehicle |
| Planning a second parked car | Doors won't open beside the lift | Run the two-car garage math first |
| Measuring with the door closed | The roof hits the track at full rise | Measure with the door open |
| Anchoring across a joint | The anchors can't hold as designed | Shift the layout clear of joints |
| Forgetting the electrical drop | Long cord runs across the floor | Plan power near the power unit side |
| Installing outdoors | Weather damage and a void warranty | Install indoors only |
In 2026, the best layout tool is still a tape measure, a roll of tape and your longest vehicle. Get those three right and the lift will fit like it was built for the room.
Find a Daytona distributor near you
Tell your local Daytona distributor your bay width, depth, ceiling height and the vehicles you work on. They'll recommend a model, quote it and install it. Have a question first? Ask the Daytona team.
- BR10-2OH-33. 10,000 lb overhead lift, ALI Certified. See the ALI Certified 2-post lift.
- LTPA10 and LTPA12. Three width settings each for awkward bays.
- LTPF9 and LTPF12. Floorplate designs, no overhead beam.
- 5-2-1 warranty. 5 years structural, 2 on power units, 1 on parts. Indoor use only.
- Since 1999. Canadian owned, serving the US and Canada.
About the author

The Daytona Team
Written by the team at Daytona Automotive Equipment, a Canadian-owned manufacturer of automotive lifts, tire changers and wheel service equipment since 1999.
- Specializations. 2-post lift selection, bay layout and placement planning, installation preparation.
- Standards. Guidance aligned to ANSI/ALI ALIS installation practice and ANSI/ALI ALOIM operation, inspection and maintenance practice.
- Reviewed by. Daytona product and technical support staff, September 2026.
Daytona Automotive Equipment Inc. · Brighton, ON, Canada · Automotive lifts, tire changers and wheel service equipment since 1999.
References and sources
- Automotive Lift Institute. Lifting It Right. ALI, accessed September 2026.
- Automotive Lift Institute. ANSI/ALI ALIS and ANSI/ALI ALOIM standards and lift inspection. ALI, accessed September 2026.
- Daytona Automotive Equipment. How thick of concrete for a 2-post lift. Daytona, 2026.
Figures in this article are representative for planning and are not quotations. Confirm requirements against the installation manual for your specific lift before purchase or installation. Daytona Automotive Equipment is not affiliated with Harbor Freight's Daytona tool brand.