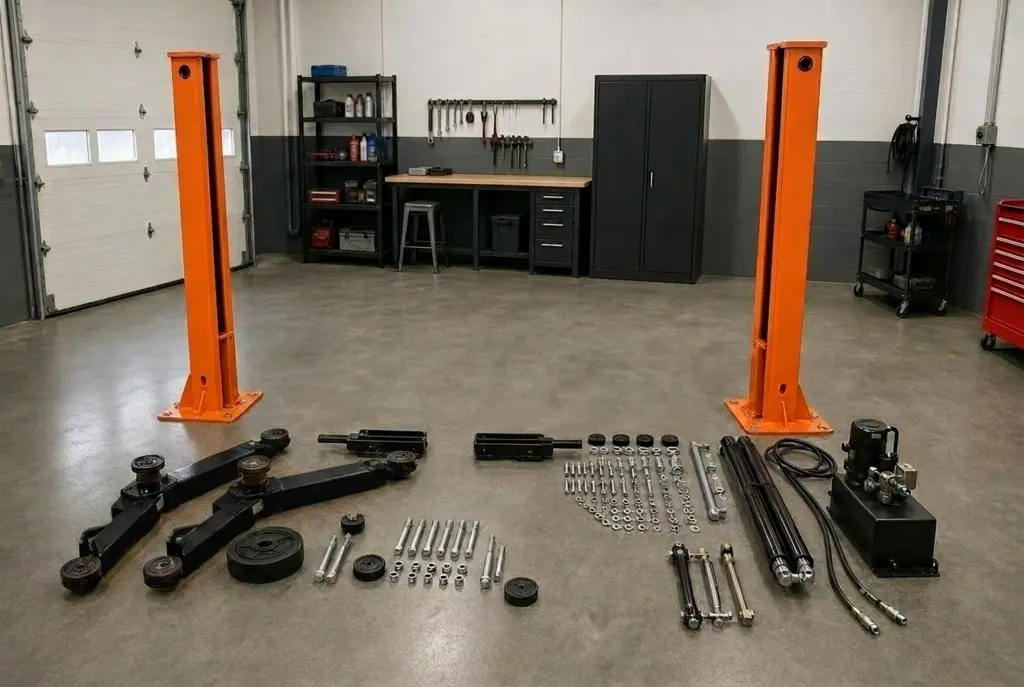
You bought the lift. It is sitting in your bay on a freight pallet, the power unit strapped to the top, and now the real question hits you: do I set this up myself, or do I call someone? It is a fair question. A car lift holds thousands of pounds of vehicle several feet over your head, and the difference between a clean install and a dangerous one usually comes down to a few details most people never think about.
This guide walks you through how to install an automotive lift the right way, from checking your concrete to your first loaded test cycle. It covers 2 post, 4 post, scissor, parking, and motorcycle lifts, because the planning and safety logic carries across all of them. Daytona has helped shops and serious home garages across the US and Canada set up equipment since 1999, and the approach below reflects that experience.
Read This First
This is a general reference guide. Every lift ships with its own installation manual containing exact specifications, and that manual always wins if anything here differs from it. When in doubt, stop and follow the manual.
How Do You Install an Automotive Lift?
Installing an automotive lift means confirming your concrete and space meet the manufacturer's specs, positioning and anchoring the columns or runways to a chalk line, mounting the power unit, routing the hydraulic lines and equalizer cables, installing the arms or platforms, and running a full no-load test cycle before any vehicle goes up. A typical 2 post install takes two people roughly three to five hours.
That is the short version. The rest of this article breaks each phase down so you can do it confidently or decide, with clear eyes, to hire a certified installer instead.
First Decision: Should You Install It Yourself?
Be honest about the job before you commit. A 2 post lift install is well within reach for a mechanically confident person with the right tools and a helper. A heavier 4 post alignment lift, anything requiring slab work, or any electrical run you are not qualified to make is a different story.
You are a good candidate for a DIY install if you have a solid, qualifying concrete floor, a second set of hands, a rotary hammer drill, a torque wrench, and the patience to follow a manual line by line. You should lean toward a professional installer if your concrete is questionable, your ceiling height is marginal, your lift is at the upper end of the capacity range, or local code requires permitted, inspected installation.
There is no prize for doing it the hard way. The cost of a service call is nothing next to a dropped vehicle. If you would rather hand it off, Daytona can connect you with installers through our find a distributor network across North America.
Before You Begin: Qualify Your Space
Most failed installs are actually failed plans. Run through these four checks before you touch a drill.
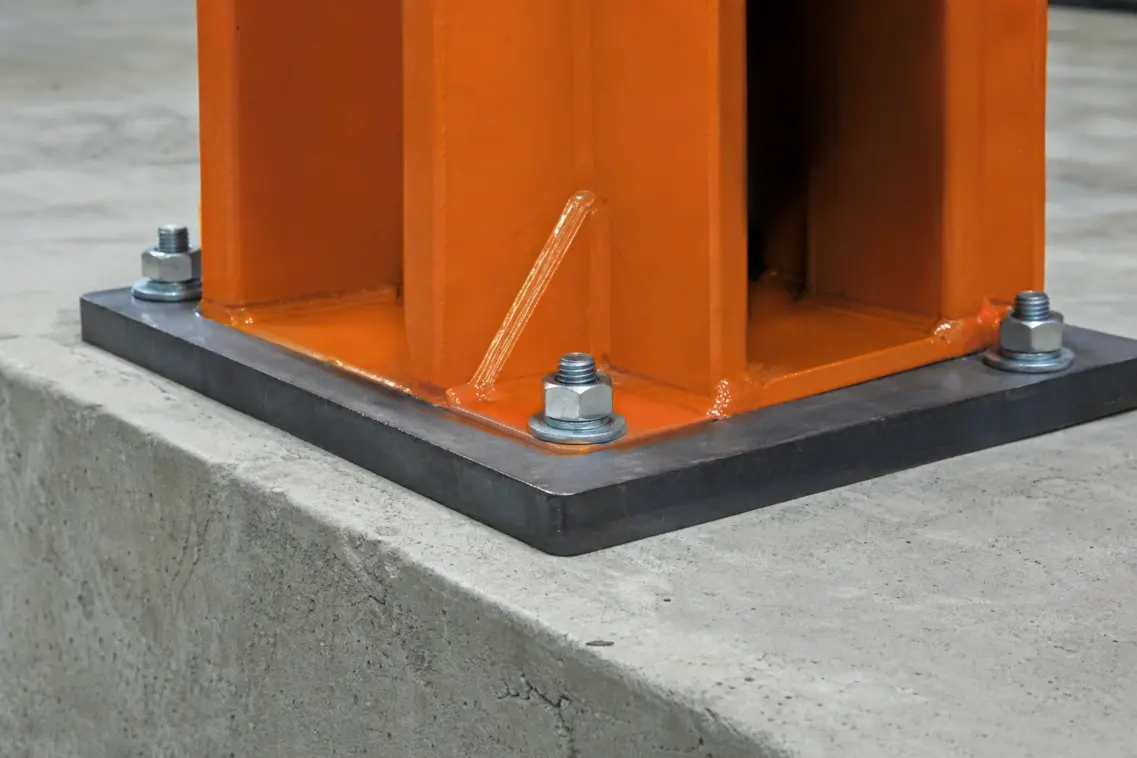
1. Concrete: The Single Most Important Factor
A lift transfers enormous point loads into a small number of anchor locations, so your slab has to be up to it. Industry safety standards and major manufacturers converge on similar minimums for typical passenger-car lifts.
| Specification | Typical Minimum (confirm in your manual) |
|---|---|
| Concrete compressive strength | 3,000 PSI minimum (4,000 PSI recommended for new pours) |
| Slab thickness, light 2 post and 4 post | 4 to 4.25 inches |
| Slab thickness, heavier 2 post (12,000 lb and up) | 6.5 inches or more |
| Cure time before anchoring | 28 days minimum |
Two rules competitors often skip. Never span an expansion seam or control joint with your anchors, and keep anchors well clear of slab edges and cracks. And never anchor into hand-mixed or unknown-strength concrete without accepting the risk or, better, test drilling and core sampling first. If your floor does not qualify, the fix is to cut out and pour a properly reinforced footing at each column, then cure it for 28 days before proceeding. For the full authoritative breakdown of slab thickness, rebar, and seismic considerations, the ANSI/ALI safety standards referenced by the Automotive Lift Institute are the definitive source.
2. Ceiling Height and Bay Dimensions
Measure your usable ceiling height against the lift's overall height, not just its rise. Overhead 2 post and high-rise scissor lifts need clearance for the top bar; if your ceiling is tight, a floorplate design solves it. Daytona's LTPF9 and LTPF12 floorplate lifts are built specifically for low-ceiling shops because they have no overhead crossbar.
For bay length, plan to position a 2 post lift roughly 11 to 16 feet from the nearest wall so a full-length vehicle fits with working room around it. Confirm the center-to-center column spacing in your manual before you mark anything.
3. Power Supply
Match your circuit to the lift before delivery day. Most single-phase 2 post and scissor lifts run on 240V with a dedicated 30-amp circuit, while many 4 post parking lifts run on standard 120V. Check the power requirement on your specific model and have a licensed electrician run the circuit. Most manufacturers, Daytona included, will not honor a power-unit warranty claim unless the wiring was done by a professional electrician, so keep that receipt.
4. Indoor Use and Code
All Daytona equipment is rated for indoor use only. Outdoor installation voids the 5-2-1 warranty. Beyond that, building code now matters more than most buyers realize, which deserves its own section.
A Quick Word on ALI Certification and Building Code
Here is something almost no installation guide tells you. As of the 2024 International Residential Code and International Building Code, automotive lifts installed in residential and commercial settings must be listed and labeled to the ANSI/ALI ALCTV safety standard, which in practice means they must be ALI certified. The code also states that lifts cannot be installed within the habitable space of a home.
This is not marketing language; it is enforceable code in the vast majority of US jurisdictions. You can read the requirement directly from the Automotive Lift Institute's IRC summary, and you can verify any model in the ALI Directory of Certified Lifts.
Why it matters for your install: if you live where these codes are adopted and you need a permit, an inspector can tag out a non-certified lift. Certification is granted per model, not per brand, so always confirm the exact model. Daytona's ALI Certified BR10-2OH-33 10,000 lb overhead 2 post lift is independently tested and certified, which makes it the straightforward choice when code compliance is on the table.
Tools and Materials You Will Need
Gather everything before you start. Stopping mid-install to hunt for a tool is how columns end up out of plumb.
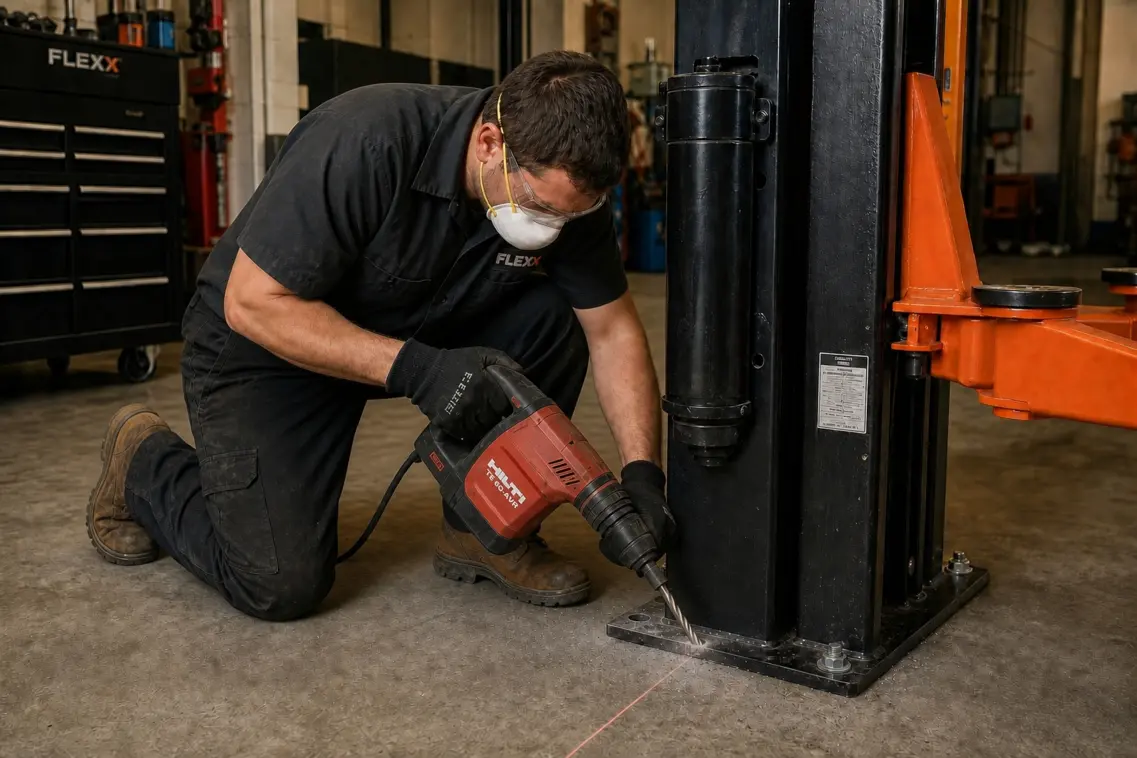
You will want a rotary hammer drill with the correct masonry bit, a torque wrench, a 4-foot level, an air blow gun or shop vac for clearing anchor holes, a chalk line, a tape measure, a socket and wrench set, the lift's supplied anchor bolts and shims, the specified hydraulic oil (commonly ISO 32 light hydraulic oil), thread sealant where the manual calls for it, safety glasses, a dust mask, and ear protection. A forklift or engine hoist for moving columns and raising the overhead bar makes the heavy moments far safer. And bring a helper. This is genuinely a two-person job.
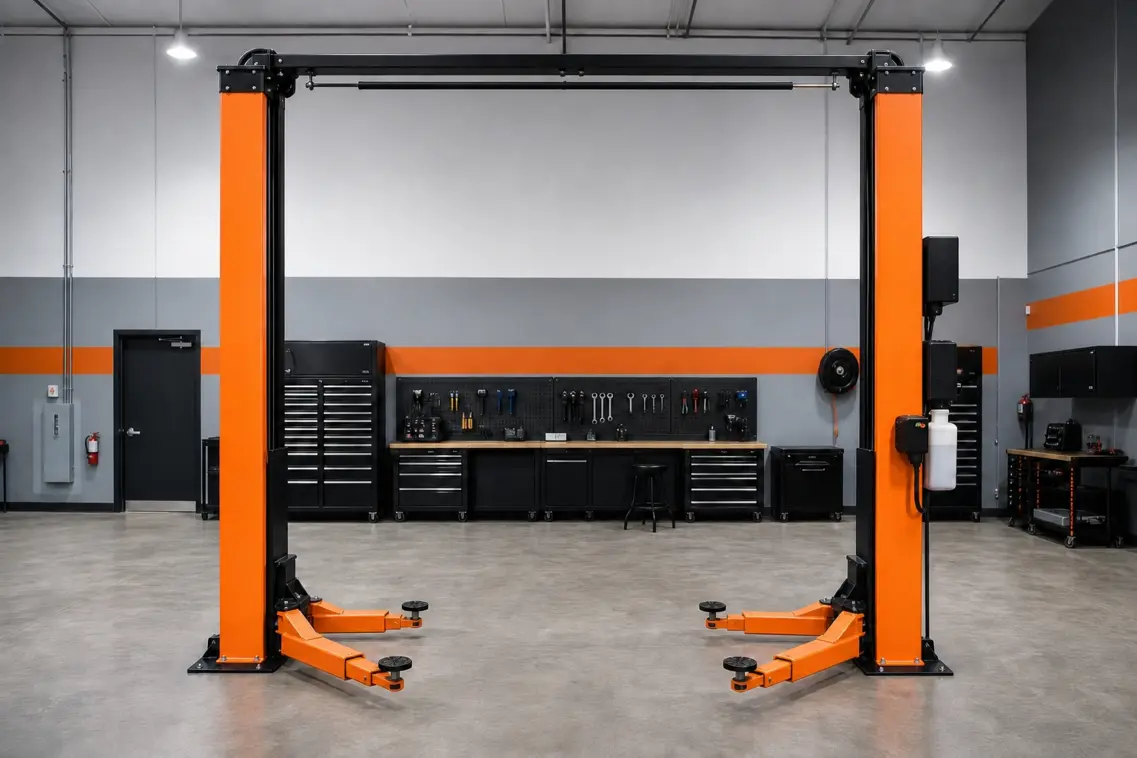
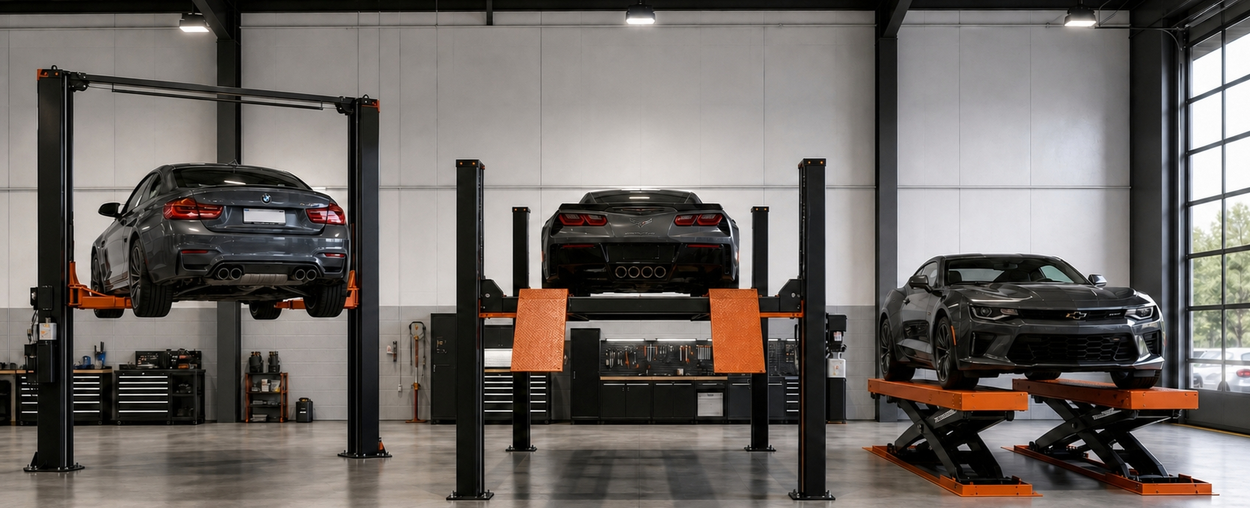
Step-by-Step: Installing a 2 post Lift
The 2 post is the most common shop and home lift, so we will walk through it in detail. The same principles, position, anchor, plumb, connect, test, apply to other types with the variations noted later.
Step 1: Unpack and Pre-Thread
Unpack everything and separate the columns from the shipping frame with an engine hoist supporting the weight. While the columns are still lying flat, pre-thread the equalizer cables and chains inside them. Threading them flat on the floor is far easier than fighting them once the columns are standing.
Step 2: Snap a Chalk Line and Stand the Columns
Measure the correct center-to-center column distance from your manual and snap a chalk line as your alignment reference. With your helper, stand each column upright and walk it onto the line. Hold it plumb and mark your drill points through the base plate holes.
Step 3: Drill and Set the First Column's Anchors
Drill through one base plate hole at a time using the plate as your guide, working the bit up and down to clear the hole fully. Blow out every speck of dust, because concrete dust dramatically reduces anchor holding power. Drive the anchors, then add shims under the base plate as needed until the column reads plumb on your level. Torque the anchors to the spec in your manual. Anchor depth and bolt size scale with capacity, roughly as follows:
| Lift Capacity | Typical Anchor Hole Depth | Typical Bolt Size |
|---|---|---|
| 9,000 to 10,000 lbs | about 3.5 inches | 3/4 inch |
| 12,000 lbs | about 4 inches | 3/4 inch |
| 14,000 lbs and up | 5 inches or more (see manual) | 1 inch |
Step 4: Install the Overhead Bar, Then Anchor the Second Column
Counterintuitive but important: on an overhead lift, assemble and raise the top bar after the first column is anchored, not after both. Wire and mount the limit switch and overhead shutoff bar, then carry the bar up two ladders and bolt it into place. Now plumb and anchor the second column. If the manual's spacing dimension drifts a fraction while you get the column perfectly plumb, prioritize plumb. A plumb column is more important than a spacing number to the last eighth of an inch.
Step 5: Mount the Power Unit and Route Hydraulics
Hang the hydraulic power unit on its column bracket, ideally with two people to avoid a costly drop, using a vibration dampener pad behind it. Connect the hydraulic lines, seal fittings as the manual specifies, and fill the reservoir with the specified oil, commonly around 3 to 4 gallons of ISO 32 depending on capacity. Tie up excess hydraulic line so the carriage cannot snag it.
Step 6: Route and Adjust Equalizer Cables
Route the equalizer and safety cables exactly as your manual's diagram shows. A misrouted equalizer cable causes uneven, binding travel under load. Once everything is connected, raise the carriages a foot or two and adjust the cable tension side to side until both carriages sit level. The cables should be taut, not over-tight.
Step 7: Install Arms and Restraints
Hang each arm on its carriage pin (a little grease here prevents squeaking), confirm the left and right configuration, then install the arm restraints so their teeth fully engage and the arm cannot swing while locked. Do not skip the spring, washer, and cotter pin that keep the restraints spring-loaded.
The First Test Run Checklist
Do Not Skip This Step
Before any vehicle goes on the lift, run a complete no-load cycle. The lift arms are what hold a vehicle several feet in the air.
- Raise to full height and listen for grinding, popping, or uneven hydraulic sound.
- Confirm both sides rise at exactly the same rate. If one lags, recheck equalizer routing and tension.
- Inspect every hydraulic fitting for leaks, wipe dry, and recheck after a second cycle.
- Lower fully and confirm both carriages descend evenly.
- Test the safety locks at mid-height by trying to push the carriage down by hand. It should not move.
Once it passes empty, raise a light test vehicle, recheck balance and cable tension, and re-inspect all anchor bolts after the first loaded raise. Re-torque the anchors again after a few weeks of use, since fresh anchors can settle.
How Other Lift Types Differ
4 post lifts and runways are generally more forgiving because the platform spreads the load, and many are designed to be moved on a wheel kit rather than permanently anchored, though anchoring is still recommended for fixed installations. Heavier alignment models like Daytona's 4 post alignment lifts carry built-in slip plates and turntables and demand thicker concrete. Note that rolling jacks and alignment accessories are sold separately and, in Daytona's case, are engineered to fit Daytona lifts specifically, so check compatibility in the lift accessories listings.
Scissor lifts skip columns entirely and bolt to the floor as a pad, making them quick to set but very sensitive to a level, qualifying slab. Parking lifts in the 4 post parking range often run on 120V and rely on mechanical lock ladders rather than equalizer cables. Motorcycle and ATV lifts are the simplest of all, but still need a flat, solid surface and careful attention to the wheel chock and ramp setup. You can compare configurations across the 2 post, 4 post, scissor, and motorcycle and ATV categories.
Frequently Asked Questions
How long does it take to install an automotive lift?
A 2 post lift typically takes two people about three to five hours, assuming the concrete already qualifies and the electrical circuit is in place. Heavier 4 post and alignment lifts can take longer, and any slab work adds at least 28 days of cure time before you can anchor.
What concrete thickness do I need for a car lift?
Most light passenger-car lifts require a minimum of 4 to 4.25 inches of 3,000 PSI concrete cured at least 28 days, while heavier lifts (12,000 lbs and up) often require 6.5 inches or more. Always confirm the exact figure in your model's manual, and never anchor across an expansion seam.
Can I install a 2 post lift myself?
Yes, a mechanically confident person with a helper, a rotary hammer drill, and a torque wrench can install a typical 2 post lift in a few hours. However, if your concrete is questionable, your lift is heavy, or local code requires inspection, hiring a certified installer is the safer choice.
Do I need a permit to install a car lift?
It depends on your jurisdiction. Many areas require a permit, especially because the 2024 IRC and IBC now require residential and commercial lifts to be ALI certified, and any new electrical circuit usually needs permitted, inspected work. Check with your local building department before installing.
What power does an automotive lift need?
Most single-phase 2 post and scissor lifts run on 240V with a dedicated 30-amp circuit, while many 4 post parking lifts use standard 120V. Have a licensed electrician install the circuit, since most manufacturers void the power-unit warranty on non-professional wiring.
Can an automotive lift be installed outdoors?
Daytona equipment is rated for indoor use only, and outdoor installation voids the warranty. Moisture and temperature swings degrade hydraulics, electronics, and finishes, so plan for a covered, climate-protected bay.
Ready to Set Up Your Shop?
Tell us about your bay and the vehicles you lift most, and we will help you choose the right lift and connect you with an installer near you.
- 5-2-1 Limited Warranty (5 years structural, 2 years power, 1 year parts)
- ALI Certified option available on the BR10-2OH-33
- Canadian-owned and operated since 1999
- Freight included on warranty parts in the US and Canada
- Active distributor network across North America